
-
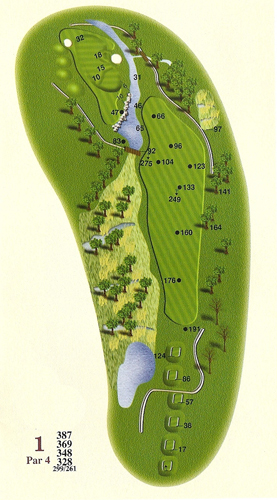
Hole #1
Par 4
Our superb opening hole is a slight dogleg left with a stream running on the left of the fairway and in front of the green, which makes your approach shot a bit tricky. You can hit driver here, but the safe play might be a fairway wood or long iron off the tee to be in the best position for an approach over the stream. Correct club selection is important on the shot to the green. -
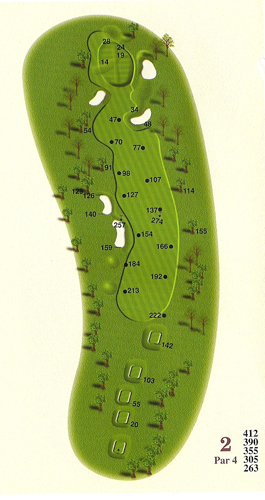
Hole #2
Par 4
This hole begins with an uphill tee shot that needs to be positioned on the right side of the fairway to avoid 2 bunkers on the left 150 yards from the green. Your shot to the green is slightly uphill with the green sloping from back to front. I would suggest you take at least 1 extra club to account for the yardage to be a total carry with no roll onto the green. -
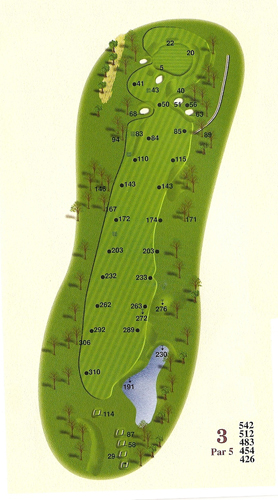
Hole #3
Par 5
Because of a small pond that is on the right side of the fairway, you'll want to keep your tee shot to the left side of the fairway. Accuracy is very important because of the out of bounds on the left side of the hole. Although you will only have a wedge for your 3rd shot into the green, this is one of the smallest greens on the course, which is protected by bunkers and grassy swails, which will require your full attention. -
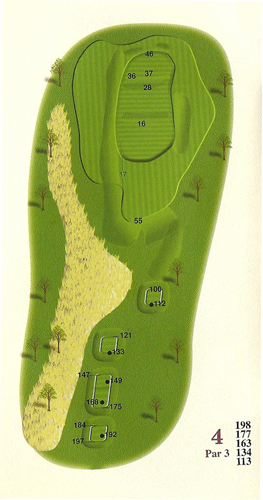
Hole #4
Par 3
This is a very challenging hole due to the fact that the green has 3 levels and is relatively narrow. Missing the green to the left will leave you with an extremely difficult pitch to save your par because of the 10 foot depression you will encounter. This is the only hole on the course without any bunkers. -

Hole #5
Par 4
Being the shortest par 4 on the front 9, this hole proves it doesn't have to be long to be very challenging. With a waste bunker running almost the entire left side of the fairway, being too cautious will bring the out of bounds on the right side into play. The green is very undulating with bunkers and swails surrounding the green. -
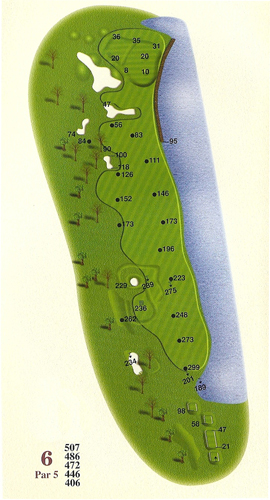
Hole #6
Par 5
This is the shortest par 5 with water down the entire right side of the fairway from tee to green. This is truly a risk/reward situation if you hit a good tee shot and are contemplating going for one of the largest greens on the course in two. Between the water on the right, and a large greenside bunker on the left, accuracy is a MUST! -
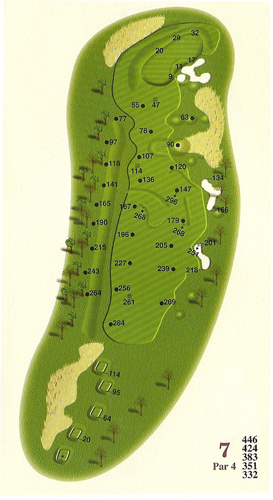
Hole #7
Par 4
Here, you can Grip it and Rip it when teeing off on the widest fairway on the entire golf course. The green is very shallow front to back, but runs diagonally from left to right 40 yards. Bunkers protect the front of the green with deep slopes and swails behind the green, so if you hit an errant approach shot, you'll be faced with a difficult pitch, making par a good score. -

Hole #8
Par 4
No. 8 is the longest hole on the course. The hole is straight with a lower level approximately 200 yards from the members tees. Your shot into the green must be carefully played to avoid hitting into a pond to the right and bunkers to the left. So club selection is critical! -
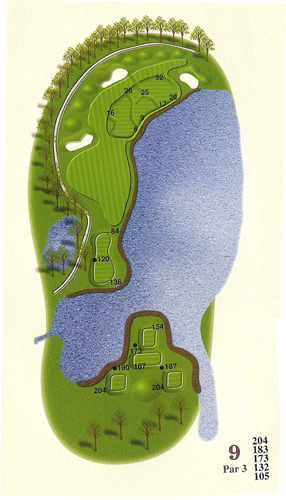
Hole #9
Par 3
This is one of our notorious Signature Holes. Your tee shot is ALL CARRY to the putting surface, so you'll need to have your fairway woods and long irons finely tuned. And remember to factor the wind, in which case hitting OVER the green may not be a bad idea!!! -
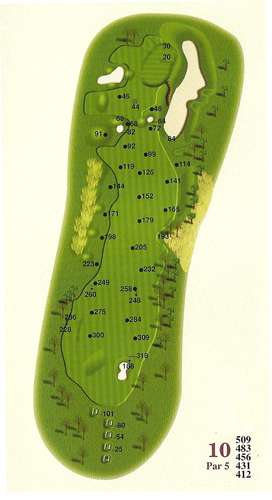
Hole #10
Par 5
Teeing off on this uphill par 5, your tee shot must be struck solidly in order to carry a fairway bunker 220 yards from the member tees. Your layup shot will be with a long iron or hybrid, leaving a short wedge into the green. Controlling your 3rd shot is critical because of the 20 foot deep bunker to the right of the green. Walking off with a par will be pleasing to your scorecard. -
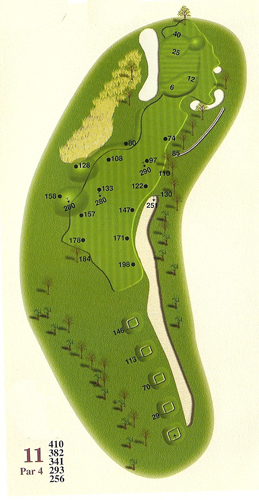
Hole #11
Par 4
On this hole you can bite off as much as you can chew! With a long waste bunker on the right of the fairway, you must carry your drive a minimum of 225 yards from the members tees. However, if you opt for the more conservative route by hitting your tee shot down the left side of this dogleg right, you'll be left with a longer club into the green, but will result in many more pars than double bogeys. -
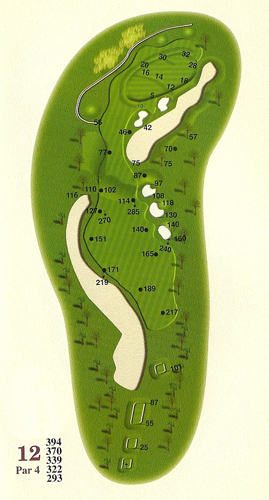
Hole #12
Par 4
This slightly left to right dogleg has a long waste bunker running along the left side of the fairway. The right side is sprinkled with bunkers that will catch many of your bail out tee shots. Your second shot to the green is slightly downhill to a narrow green with bunkers in front and grassy swails behind. Again, club selection is critical. -
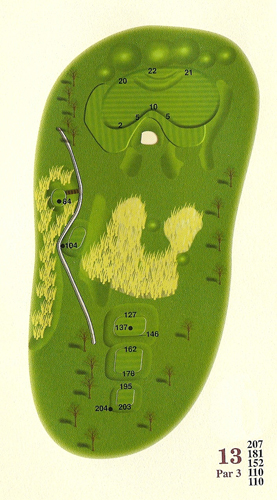
Hole #13
Par 3
This one-of-a-kind hole involves a very challenging shot off the tee. Right in the middle of this kidney shaped green is a cavernous bunker that will swallow up any mishit iron shots. Ball position relative to the hole location when on the green is always at a premium in order to two putt. -
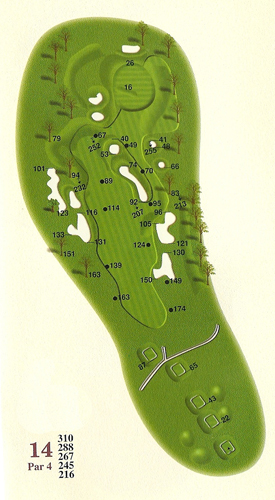
Hole #14
Par 4
Although this is the shortest hole on the course, don't let the distance fool you because it has an army of deep pot bunkers eagerly awaiting any tee shots that miss the fairway. The smart play is to hit a long iron or hybrid off the tee, setting up a short approach shot to a relatively flat green. -
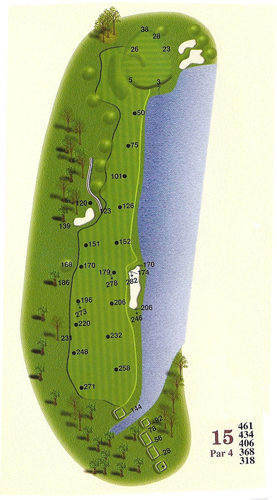
Hole #15
Par 4
No. 15 is the the most difficult hole of the back 9. Playing this hole effectively requires some thought as to how aggressively you want to be off the tee. Many balls have found their watery grave to the right of this long hole when trying to over power their tee shot. There is a bunker that is situated along the right side of the fairway that can help keep your ball in play, but be careful on your next shot when faced with a 180-200 yard carry over water. The 15th green is the largest on the back side, but 3 or 4 putting is not out of the question if you lose your focus. -
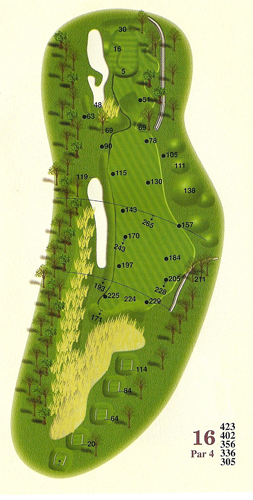
Hole #16
Par 4
This right to left dogleg tempts you to cut the dogleg with your tee shot, but be aware of the deep waste bunker on the left that awaits any shots that are pulled or hooked due to being overly aggressive. The shot to the green is slightly downhill and is guarded by a large bunker to the left and large trees to the front- right portion of the green. -
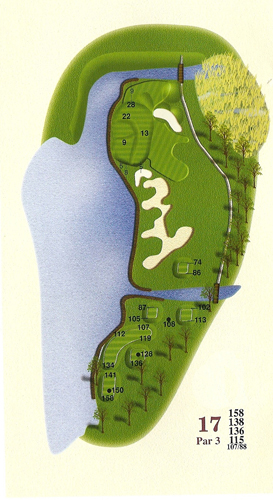
Hole #17
Par 3
The second of three outstanding finishing holes at Windermere. Although the hole measures from 125 to 160 yards, water is lurking in front, on the left and behind the hole. Trying to avoid the water hazard will surely bring into play the bunker to the right of the green. With the combination of water, wind and a relatively small green, don't be surprised if you encounter a bit of anxiety before the ball is struck! -
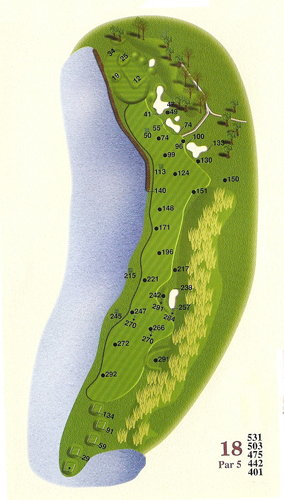
Hole #18
Par 5
A breathtaking view of Lake Windermere and the clubhouse dominates No. 18, which is basically a three-shot hole. The daring golfer willing to attempt hitting the green in two, has to negotiate the water that juts out into the fairway and must carry the ball nearly all the way to the green. Many feel as if they are playing a version of #18 at Pebble Beach. This risk/reward hole will be sure to keep you coming back for more!!!